In the realm of Git version control, you gain the powerful ability to keep track of changes in your project files. Whether you’re working alone on a personal project or collaborating on a big application, being skilled at monitoring and managing these changes is crucial.
This tutorial focuses on exploring Git’s various tools for tracking changes. From small local changes waiting to be saved to significant alterations stored in different versions, Git provides a reliable and flexible system that ensures you never lose sight of the path you’ve taken. Tracking changes isn’t just about recognizing that a file has changed; it’s about understanding what those changes are, who made them, and when they were made. Git, like a diligent historian, allows you to delve deep into your project’s history, providing a detailed snapshot of any moment in time.
Effective change tracking brings benefits like better project management, easier problem-solving, and smoother collaboration. It allows you to trace back to the root of a problem or understand how your project has evolved over time. It empowers you to revisit the past while shaping the future of your code. In this comprehensive tutorial, we’ll explore various methods of tracking file changes in Git, including commands like git diff, git status, git log, and more. By the end of this journey, you’ll have a solid grasp of Git’s tracking capabilities and be ready to use them in your projects.
Join us on this exploration of Git’s world and discover the secrets of effective change tracking. Whether you’re a beginner or an experienced developer, there’s always something new to uncover in the ever-changing landscape of Git’s version control. Let’s get started!
The Significance of Tracking File Changes in Git
At the heart of version control systems like Git is the ability to keep an eye on how files change over time. This is crucial for software developers, data scientists, and anyone involved in projects that evolve over time. So, why is tracking file changes in Git so important? Here are some key reasons:
1. Understanding Project History: Making Sense of the Timeline
Tracking changes in Git is like unraveling the timeline of your project. With each commit, Git provides a clear and chronological record of every change, shedding light on how your project has evolved. This is incredibly useful for understanding how your project got to its current state. It helps you figure out when a feature was added or when a bug was introduced. Git becomes your project’s historian, guiding you through its history.
2. Facilitating Collaboration: Keeping Code in Harmony
In collaborative coding, tracking changes acts as a conductor, ensuring that every team member’s contributions play together harmoniously. It allows you to see who did what, preventing conflicts that can arise when multiple people work on the same code simultaneously. Change tracking helps contributors sync up effortlessly, turning code collaboration into a smooth performance.
3. Reverting Changes: A Lifesaver in Code Troubles
In the complex world of software development, bugs and unexpected issues can appear. This is where tracking changes becomes your lifeline, offering a way out of problems. If a bug is discovered or changes lead to unexpected results, Git allows you to turn back time. You can return your project to a state before those problematic changes, saving your code from potential disasters.
4. Documenting Progress: A Record of Commits
Tracking changes is like chronicling your project’s journey. Each commit not only contains code changes but also tells a story. It documents why and how those changes were made. This archive is invaluable for current and future project stakeholders. It’s a roadmap of progress, a guide to decisions made along the way, and a testament to your project’s growth.
5. Boosting Efficiency: Navigating Code with Precision
In the complex world of code, efficiency is crucial. Change tracking helps you navigate your code with precision by pinpointing when a change happened and who made it. This reduces the time spent on investigative work. Efficiency isn’t just a luxury; it’s essential for quick troubleshooting and informed decision-making in the fast-paced realm of software development.
As this tutorial progresses, we’ll dive deeper into each of these aspects, unveiling specific commands and strategies to help you effectively use change tracking in your Git repositories.
Roadmap to Tracking Changes
Tracking changes in Git entails a choreography of steps, each choreographed with specific commands. While the precise sequence may vary with individual needs and workflows, the ensuing roadmap outlines the overarching procedures:
1. Identifying Uncommitted Changes: The First Footprints
Starting to track changes begins with finding out what’s been modified in your code since the last commit. This isn’t guesswork; it’s a step-by-step process, and the key tool here is the “git status” command. This command acts like a compass, showing developers which files have been changed and giving a quick summary of those changes. To get into the nitty-gritty details, we turn to the “git diff” command. This command is like a detective magnifying glass, showing changes line by line and file by file. It helps you examine the details of each change and figure out what to do next.
2. Staging Changes: Preparing for the Grand Performance
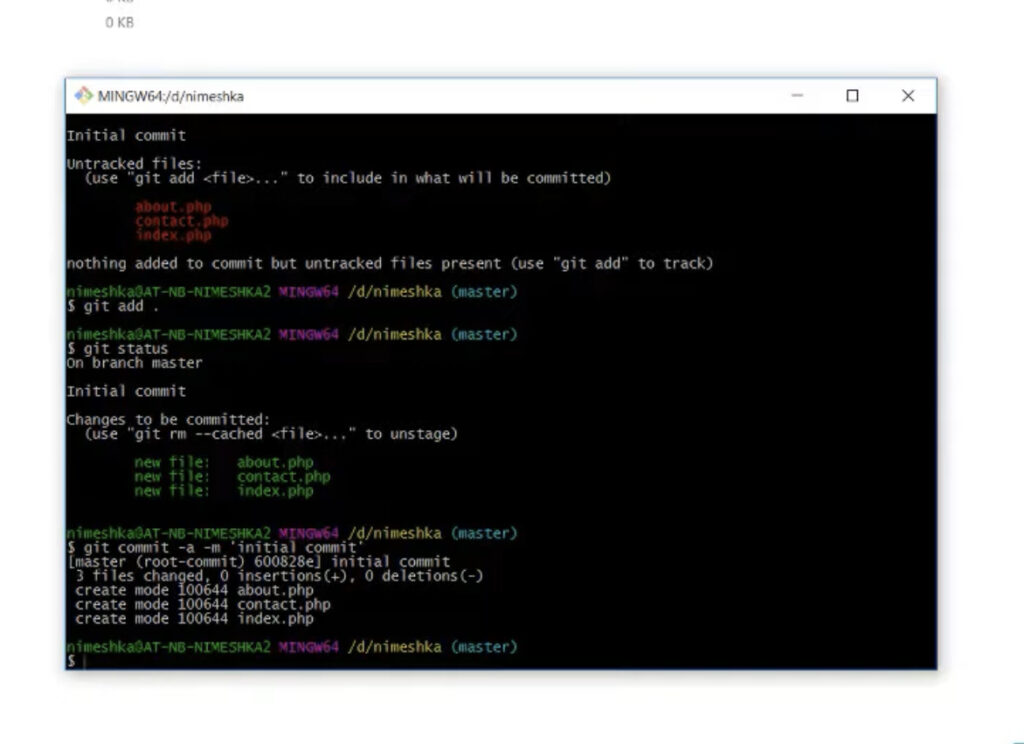
Once you’ve seen what changes have been made, it’s time to decide which changes should be part of the next big step, the commit. Think of it as casting actors for a play. This is where the “git add” command comes in. It’s like the director’s decision, picking which files will be in the next snapshot of the project. These chosen files get prepared, like actors getting ready with costumes and lines, for their role in the project’s next scene.
3. Committing Changes: Making It Official
With everything set and the actors ready, it’s time to make it official. The “git commit” command announces that the changes are officially part of the project’s history. This phase isn’t just about taking action; it’s about telling a story. The commit message is like the script, documenting the changes and giving context to the audience (and fellow developers). It’s the moment when code becomes history, leaving its mark on the project’s record.
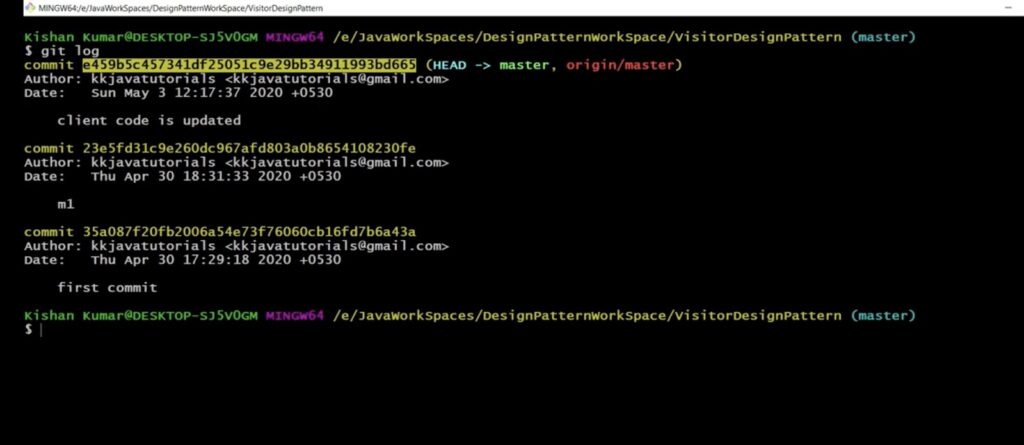
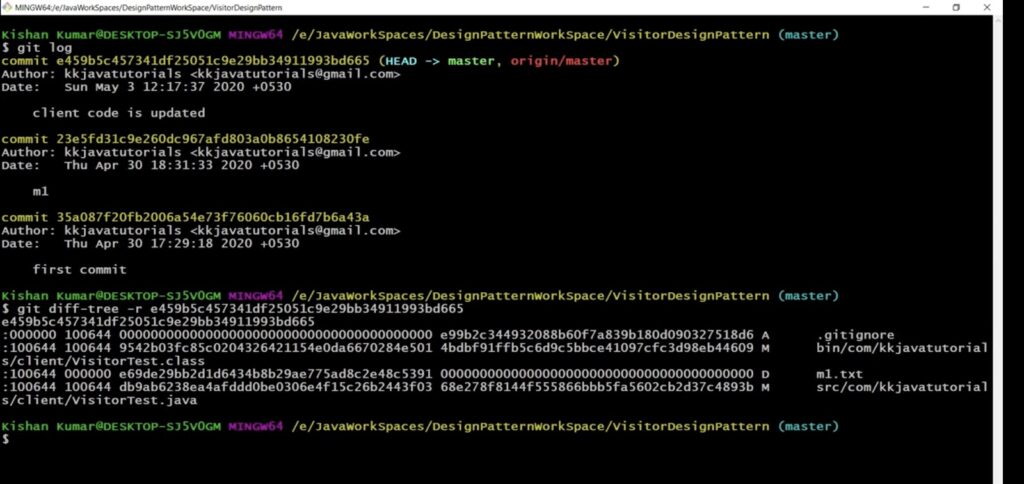
4. Reviewing Commit History: Looking Back
In the world of version control, the “git log” command acts like a script, showing the history of commits. It’s where you can look back and go through the history of your code. Each commit is a chapter in the story, revealing who made the changes, what those changes were, and when they happened. It’s a journey through time, helping you understand how the project evolved and why certain changes were made.
5. Examining Specific Commits: A Closer Look
Sometimes, you need to take a closer look at specific parts of the story. This is where the “git show” command becomes a magnifying glass. It lets developers dissect individual commits, diving into the details of the changes they contain. It’s like analyzing a crucial scene in a play, understanding the subtleties, and appreciating the craftsmanship that went into it.
6. Comparing Versions: Side-by-Side
In the ever-evolving world of code, comparisons are like strokes on a canvas, showing the artist’s intent. Git allows you to compare different versions of the same code using the “git diff” command. You can specify what you want to compare, shedding light on how the code has evolved over time. It’s like comparing two brushstrokes to see the nuances in the artist’s technique.
7. Conflict Resolution: Navigating Challenges
As your code journey continues, conflicts can arise when different changes clash. Git becomes your compass, guiding you through the challenges of conflict resolution. Its tools help you identify and address these clashes, making sure the code progresses smoothly. It’s about finding common ground and making different contributions work together.
8. Reverting Changes: Rewriting the Story
In version control, sometimes you need to rewrite scenes. When the story takes an unexpected turn or a bug sneaks in, Git provides ways to rewrite the script. Commits can be rolled back, and changes can be undone using commands like “git revert” and “git reset.” It’s like the director’s job to ensure the story unfolds as intended, with the power to revisit past moments and make corrections.
As the tutorial continues, each step will be explored in detail, supported by relevant commands and practical examples to help you effectively track changes in your Git projects.
Setting Up the Git Environment
Before delving into the nuanced commands and strategies governing change tracking, one must ensure a well-prepared Git environment. Although the foundational Git setup isn’t dissected here, it’s imperative to acknowledge that an organized Git habitat streamlines the tracking process. A rapid guide to preparing your Git environment encompasses:
Verifying Git Version: Ensuring Git’s Up-to-Date Relevance
Before you start tracking changes, it’s important to check your Git setup. You can do this by confirming the Git version you have installed. Just run the “git –version” command in your terminal or command prompt. This is like checking your gear before a trip to make sure everything’s in order.
Updating Git: Staying Up to Date
Git evolves over time, with new features and fixes in each update. If your Git version is outdated, it’s like using an old map for navigation. To make sure you have the latest tools, consider updating Git. Instructions for this depend on your operating system and can usually be found on the official Git website. It’s like upgrading your ship to ensure smoother sailing.
Checking Git Configuration: Setting Sail with the Right Identity
Before you dive into change tracking, confirm your Git settings. This includes things like your username and email, which are used to identify your commits. To check this info, use the “git config –list” command. It’s like making sure your crew is ready and properly identified before starting your journey.
Navigating to the Git Repository: Finding Your Way
In the world of version control, you need to know where you are. To track changes, you have two options: either create a new Git repository with “git init” in your project’s folder or navigate to an existing repository using “git clone.” It’s like deciding whether to set sail from a familiar port or chart a course to a new destination.
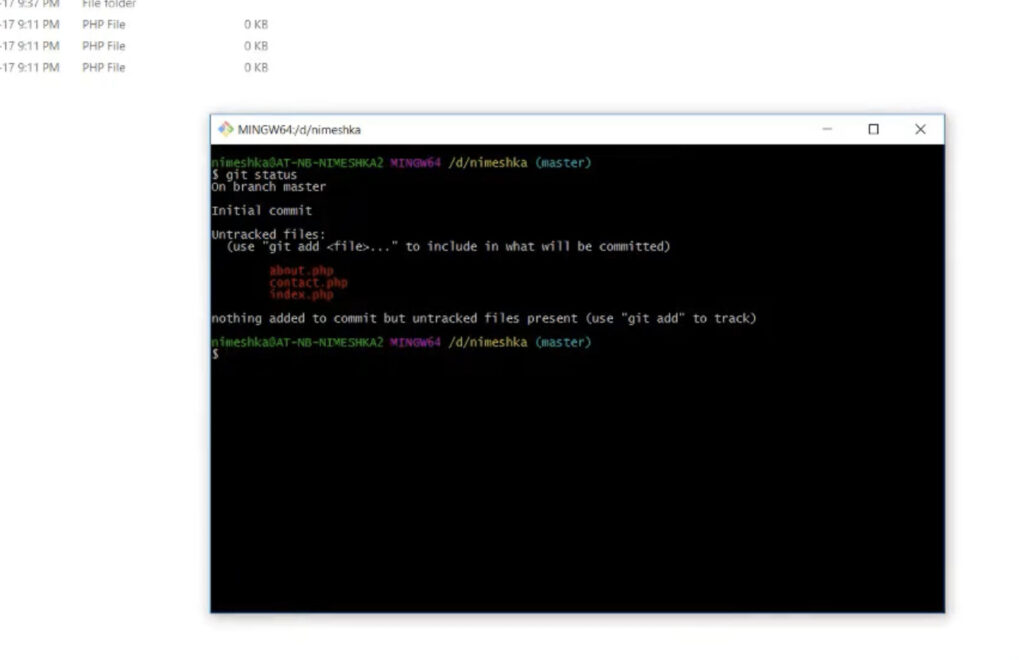
Ensuring a Clean Working Area: Getting Ready
As a good practice, your workspace (your ship) should be clean before you start your version control journey. A clean workspace means there are no uncommitted changes. To check the status of your workspace, use “git status.” If you find any uncommitted changes, it’s a good idea to commit them before you set off. It’s like making sure your ship is in good condition before a big voyage, reducing the chances of unexpected issues.
Now that your Git environment is set up and ready, the tutorial will dive into the details of change tracking in Git.
The Essence of Git Diff
When you’re learning programming with Git, there’s a really important tool called “git diff.” This tool helps you see the differences between changes in your code. It shows you what’s different between commits, commits and your current work, and more. It makes it easy to understand how your code has changed.
Think of “git diff” like a flashlight that helps you see the history of your project’s code. It lets you look closely at the changes, showing new things in green with a “+” sign and things that got removed in red with a “-” sign. This color-coding makes it much easier to understand what’s happening.
You’ll use the “git diff” command when you want to check changes before saving them, compare files or branches, find out where a bug started, or when you’re reviewing code during collaborations. It’s a tool that helps you dig into code changes, so you can understand your project’s history better, and it’s great for debugging and working together with others.
So, as you start your journey with Git, remember that “git diff” is like your trusty guide. It helps you see what’s going on with your code as it evolves in your Git project.
Unveiling the Git Diff Command
In the world of programming and version control, Git Diff is like a trusty detective. It helps you spot the differences between important moments in your project’s history. These moments could be two commits, a commit and your current work, or even two separate files. It’s a powerful tool that digs deep into your project’s past and shows you exactly what’s changed.
When you run Git Diff, it gives you a detailed report of all the changes between those moments you selected. New additions to your code show up in bright green with a “+” sign, and things that got deleted show up in bold red with a “-” sign. This color and symbol system makes it really easy to see what’s going on. So, when you’re learning programming and working with Git, think of Git Diff as your detective tool. It helps you see how your code has evolved over time, and it makes it simple to spot changes in your project.
Unfolding the Role of Git Diff in Change Tracking
Git Diff is a super useful tool in the world of programming. Here’s why:
- Checking Changes Before Committing: You can use Git Diff to look at what’s different in your code since the last commit. This helps you make sure you’re only adding the changes you want before saving them;
- Comparing Files and Branches: Git Diff is great at comparing different files and branches. It’s handy when you’re working on multiple branches or want to see how a specific file has changed over time;
- Finding Bugs: When a sneaky bug creeps into your code, Git Diff is like a detective. It helps you figure out what went wrong by showing you the code before and after the problematic change;
- Handling Code Merges: Git Diff takes the spotlight when you’re merging code. It lets you review all the upcoming changes, so you know what’s about to be merged and can avoid potential issues;
- Creating Patch Files: Git Diff can also create patch files that show the differences between two points in your project’s history. You can use these patch files as templates for similar changes in other projects or branches.
As we dive deeper into Git Diff, we’ll explore its various options and provide clear examples to help you become a pro at using this powerful tool in Git.
Vigilance Over Uncommitted Changes
In the course of project development, vigilance over the tapestry of uncommitted changes takes precedence. These changes, akin to a work-in-progress canvas, warrant meticulous tracking to ensure a lucid understanding of their forthcoming integration into the project’s fabric.
Stepwise Guide to Unearthing Uncommitted Changes with Git Diff
Delving into the heart of Git’s toolbox, one discovers the Git Diff command, a beacon illuminating uncommitted changes. Here’s the path to uncovering these changes:
- Launch the Terminal or Command Prompt;
- Navigate to the bosom of your project directory, lovingly cradled by Git’s version control;
- Type “git diff” and gently tap the Enter key.
Behold! The screen will unveil the alterations, born since the last commit but not yet pledged. It lays out the script of transformation, marking additions with a “+” and deletions with a “-“.
Understanding the Lexicon of Git Diff for Uncommitted Changes
The Git Diff output is a tapestry of insights into the untamed realm of uncommitted changes. Here’s the cipher to decipher it:
- File Indicator: Each file dons a header, revealing its name, aiding in the attribution of changes;
- Change Indicator: “+” heralds the arrival of new lines, while “-” signifies the vanishing of lines from existence;
- Code Context: The changes are set in the context of their brethren lines, providing the backdrop to their story;
- Color Coding: In the world of colorful terminals, green signifies additions, while red signifies deletions, rendering the narrative visually lucid.
Remember, Git Diff is the steward of uncommitted changes. For those already staged, Git has distinct commands, such as “git diff –staged” or “git diff –cached” to illuminate their path. As we journey forward, the Git Diff command serves as our compass, guiding us towards mastery in the realm of change tracking within Git.
Tracing the Footprints of Committed Changes
After the pledge to Git’s repository, the vigil over committed changes becomes the sentinel’s duty. It unveils the annals of project evolution, granting insight into the inception of alterations and more.
Articulating the Necessity of Tracing Committed Changes
Tracing committed changes is pivotal for myriad reasons:
- Project Evolution: Each commit is a capsule capturing the essence of the project at a specific juncture, a testament to its evolution;
- Bug Expedition: Should a bug infiltrate the code, the commit history becomes the treasure map, leading to the origins of the anomaly;
- Collaborative Code Symphony: In the symphony of teamwork, the commit history is the score, offering glimpses into the harmonies contributed by each musician;
- Documenting Progress: Commit messages serve as the ink, inscribing context and intent, serving as a tome for present and future developers.
A Guided Tour of Tracked Committed Changes Using Git Log and Git Show
In navigating the tapestry of committed changes, the trusty companions are Git Log and Git Show:
- To consult the chronicles, employ the “git log” command, unfurling a roster of commits in reverse chronological order;
- To scrutinize a commit’s very soul, invoke the “git show” command, complemented by the commit hash, unveiling the code metamorphosis.
As the curtain rises on this narrative, Git Log and Git Show unveil the layers of history, offering profound insights into your project’s evolution, aiding in debugging, fostering collaboration, and chronicling the journey.
Deciphering the Archive: Git Log and Git Show
The Git Log, a library of commit engravings, bears witness to the author, date, and the commit’s message, unveiling a grand panorama of the project’s history.
Git Show, an orator of specifics, delves beyond the surface, unfurling the commit’s essence, complete with metadata and the ethereal diff output, where “+” marks additions and “-” signals deletions. Together, Git Log and Git Show transform into the luminous lanterns guiding us through the labyrinth of Git’s committed changes. They illuminate the past, facilitating comprehension, and bolstering debugging, collaboration, and documentation.
Git Status: The Sentinel of File Changes
Amidst the symphony of Git commands, Git Status stands as the vigilant sentry. It offers a panoramic view of your repository’s present state, revealing the metamorphosis of files – modified, staged, or untracked.
Understanding the Doctrine of Git Status
Git Status, the oracle of the working directory and staging area, presents a canvas of your repository’s dynamics, answering questions like:
- What files have danced to the tune of change since the last commit?;
- Which changes await the grand stage of commitment?;
- Are there files lurking in the shadows, untracked and unseen by Git’s watchful eye?
Mastering the Art of Surveying with Git Status
- Invoke your trusty Terminal or Command Prompt;
- Chart a course to your cherished project directory under Git’s benevolent embrace;
- Utter the incantation “git status” and let your keyboard enchant the Enter key.
The canvas unfolds, painting a picture of your working directory and staging area. Behold, the scrolls of change, divided into three sections:
- Changes not staged for commit: Files that have tasted the quill of alteration but await the spotlight of commitment;
- Changes to be committed: The chosen ones, staged and ready to take their place in Git’s chronicle;
- Untracked files: The wanderers, currently beyond Git’s ken, waiting for their introduction.
Git Status, a beacon in the labyrinth, guides your steps, whether you’re gearing up for a commitment, pondering the state of your files, or unraveling a puzzle. It’s a companion on the journey of change tracking.
Comparing the Tapestries: Different Versions of Files
In the realm of Git, the need to compare different incarnations of a file often arises. This journey offers insight into the file’s evolution, illuminates the path to debugging, and unveils the ramifications of impending changes.
Embracing the Significance of Version Comparison
Comparing different versions of a file is a treasure trove of insights for diverse endeavors:
- Understanding Evolution: Witnessing the metamorphosis of a file unveils the project’s evolutionary dance;
- The Bug Detective: When a bug creeps into the code, the history of a file points the finger at the culprit;
- Impact Assessment: Before wielding the chisel of change, a glimpse into the file’s history unveils the ripple effect of alterations.
A Guided Journey into the Art of Comparing Versions with Git Diff
To compare the varied incarnations of a file, one calls upon the Git Diff command. Here’s the ritual:
- Seek the Commit Hashes: Delve into the Git Log and unveil the commit hashes of the desired versions;
- Cast the Comparison Spell: Invoke Git Diff with the syntax “git diff <first-commit-hash>..<second-commit-hash> — filename.”;
- Witness the Revelation: Behold, the differences emerge, transcribed in the language of Git Diff, with “+” and “-” as your guide.
In this odyssey, Git Diff serves as the torchbearer, illuminating the path to understanding changes between file versions.
Navigating the Storm: Resolving Conflicts in Change Tracking
In the symphony of collaborative Git endeavors, conflicts occasionally raise their dissonant notes. These conflicts emerge when disparate branches lay claim to the same fragment of a file, leaving Git in a quandary.
Unmasking the Genesis of Conflicts
Conflicts often enter the stage during the merging of branches or the retrieval of remote changes:
- When Branches Converge: Two branches, each with their own set of changes to a file, merge, sparking a conflict;
- The Remote Tug of War: Local and remote branches engage in a duel, each with its vision for a file’s fate, birthing a conflict when they clash.
When conflicts arise, Git unfurls a banner, marked with symbols, like so:
<<<<<<< HEAD
…your changes…
=======
…their changes…
>>>>>>> branch-name
To tame the tempest of conflict:
- Open the file in your text editor;
- Locate the battle lines, demarcated by Git’s conflict markers;
- Decide the fate of each line – yours, theirs, or a harmonious blend;
- Erase the conflict markers once peace is restored;
- Save the file;
- With the resolved file(s) staged, commit your reconciliation with “git commit.”
Remember, resolving conflicts can be a complex dance. Take your time, seek guidance when needed, and embrace Git’s conflict resolution as a powerful tool for collaboration and code integrity.
The Symphony of Change: Best Practices in Git Tracking
The mastery of Git’s change tracking art is a journey paved not just with commands but with best practices. These practices streamline work, avert conflicts, and bestow a pristine and navigable history.
The Scroll of Best Practices for Harmonious Change Tracking in Git
Consider these best practices as your guiding stars:
- Frequent Committing: Don’t amass changes like treasures in a chest; commit them frequently. It simplifies progress tracking and isolates issues;
- Articulate Commit Messages: When committing, pen down a lucid and concise message that unveils the purpose of the commit, enhancing the readability of your history;
- Branching for Tasks: When engaged in multiple feats, grant each its branch. This forestalls conflicts and keeps your workspace organized;
- Merge or Rebase Rhythm: If your branch dances long with the main branch, often synchronize it with merges or rebases to prevent cataclysmic conflicts;
- Conflict Resolution Symphony: In the realm of conflicts, resolve with care. Comprehend both sides before rendering a verdict.
Embark on your Git tracking odyssey armed with these best practices, forging a path of efficiency, collaboration, and code integrity.
The Impact of Adopting Best Practices in Git
When you start using Git, there are some smart moves that can make your experience better:
- Keep Things Clear: Make a habit of committing your work regularly with clear and descriptive messages. Use branches wisely. This makes it easier to see how your project is progressing;
- Solve Problems Faster: When a problem pops up, your history of clear and frequent commits can help you pinpoint where things went wrong and when it happened;
- Teamwork Made Easy: These practices aren’t just for you. They make it easier for others to understand and work with your code. Collaboration becomes smoother;
- Less Conflict, More Peace: By regularly merging or rebasing and dealing with conflicts carefully, you can avoid or handle conflicts without much trouble.
Adding these practices to your workflow might take a bit of patience and discipline, but they pay off in terms of productivity, smoother teamwork, and better code.
In the world of Git, even with the right practices, you might run into issues now and then. But don’t worry, many of these problems are common, and there are well-known solutions to guide you through.
The Ledger of Common Challenges on the Developer’s Journey in Tracking Changes
Here lies a list of common challenges that developers may encounter while navigating the seas of Git change tracking:
- The Clash of Conflicts: Conflicts, like mighty whirlpools, can emerge when different branches or repositories lay claim to the same fragment of a file;
- The Vanishing Act: Sometimes, changes seem to disappear into the abyss – a missing commit, or alterations accidentally stranded on the wrong branch;
- The Regrettable Commits: Mistaken commits, akin to navigational errors, may lead to changes in unintended destinations or branches;
- The Murky Waters of Commit History: A dense fog may descend upon the commit history, obscuring understanding due to unclear messages or a labyrinth of branches and merges.
Unraveling Solutions to Navigate Git Challenges
When you run into common issues in Git, here’s how to solve them:
- Dealing with Conflicts: When your code conflicts with someone else’s, you’ll need to sort it out manually. This is explained in the “Dealing with Conflicts when Tracking Changes” section. Once you untangle the mess, you’ll know how to merge or pull your changes;
- Finding Lost Changes: If you can’t find your changes, you can use the “git log -S” command to search for specific changes in your commit history. If you accidentally ended up on the wrong branch, you can either stash your changes temporarily or create a new branch to fix it;
- Undoing Mistaken Commits: Git has tools like “git revert” or “git reset” for when you make a commit you regret. These help you undo the effects of a commit. If you need to move changes to a different place, you can use “git cherry-pick.”;
- Getting Clarity in History: To make sense of your commit history, use the “git log” command with different options. For example, “git log –oneline –graph” gives you a simpler and graphical view of your history. It’s important to use clear commit messages and branches to keep your history easy to understand.
Remember, Git is a pro at navigating challenges. Embrace these issues as opportunities to become better at using Git because challenges often lead to growth and learning.
Conclusion: Sailing Smoothly through the Waves of Git
In the world of software development, Git is like a reliable tool that helps developers manage their code changes. As we wrap up our journey through Git and tracking changes, let’s recap what we’ve learned.
- We’ve seen how important it is to follow best practices in Git. These practices, like making clear and frequent commits with short messages and using branches wisely, make tracking changes much easier;
- But in the world of Git, challenges are bound to happen. We’ve tackled common issues like conflicts, lost changes, mistaken commits, and confusing commit histories with clear solutions. These problems, instead of being roadblocks, are chances to learn and improve.
In the end, it’s crucial to see these challenges as learning opportunities. Git is a powerful tool that can handle complex situations in software development.