
Git stands as a formidable instrument, empowering developers with seamless code management and change tracking capabilities. Ubiquitous in the software development realm, it has evolved into an indispensable companion for countless developers. This article delves into the three core stages of Git and offers practical guidance on harnessing their potential.
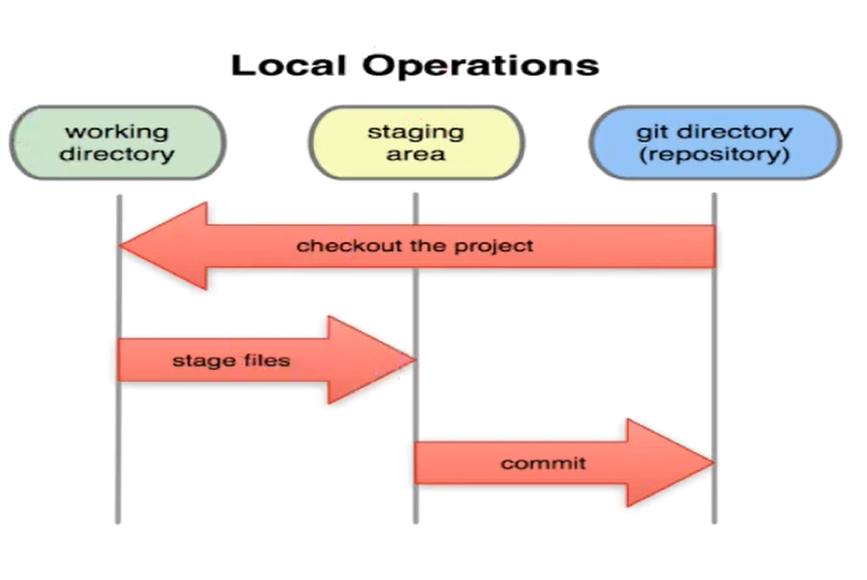
Developers employ three primary stages within Git for code management: the working directory, the staging area, and the repository. These stages each serve distinct purposes and are applied uniquely to oversee code modifications.
Understanding the Working Directory in Git
The working directory serves as the initial phase in Git, acting as the arena where developers actively modify their code. This space accommodates alterations to existing files and the addition of fresh files to the project. Essentially, the working directory corresponds to a folder on your computer where you can freely edit your code.
For instance, let’s say you’re involved in a website project, and your goal is to introduce a new feature to the homepage. In this scenario, you’d access the project folder on your computer and proceed to make the necessary adjustments to the files governing the homepage. These modifications would reside within the working directory, awaiting further action from Git to commence tracking them.
Exploring Git’s Staging Area
The staging area takes center stage as the second crucial phase in Git. After you’ve implemented alterations to your code within the working directory, the staging area becomes your indispensable tool for reviewing and organizing these changes before they find their way into the repository.
Think of the staging area as a temporary holding space for your code modifications. It empowers you to meticulously inspect your changes, ensuring everything functions as expected, prior to their formal commitment to the repository. Additionally, it offers an efficient means to compartmentalize your modifications into coherent segments, allowing you to commit them individually.
For instance, consider a scenario where you’ve made edits to multiple files in your project, but you only intend to commit changes from one specific file. Here, the staging area proves invaluable as you can selectively review and add that particular file to the staging area. Consequently, when you commit your changes, only the modifications to that chosen file will be incorporated into the repository.
Exploring the Git Repository
The repository marks the culmination of Git’s three-stage journey. Within the repository, every single code modification finds its permanent residence, meticulously logged and tracked by Git. Essentially, it functions as a comprehensive database, chronicling the entire history of changes made to your code.
Once you’ve attained satisfaction with the changes you’ve executed in both the working directory and the staging area, it’s time to immortalize them within the repository. This act involves committing your changes, effectively capturing a snapshot of your code at that specific moment in time, and ensuring that Git diligently monitors it.
For instance, consider a scenario where you’ve introduced alterations to your website project, and you’re prepared to cement those changes within the repository. This process entails the use of Git’s command line to initiate a commit, resulting in your modifications being securely stored within the repository for future reference and version tracking.
Mastering Git’s Three Stages: A Step-by-Step Guide
Now that we’ve explored the intricacies of Git’s three fundamental stages, it’s time to delve into how to effectively utilize them. Employing Git can be simplified into a coherent three-step process: initiating code modifications, scrutinizing and structuring these changes, and concluding by committing them to the repository.
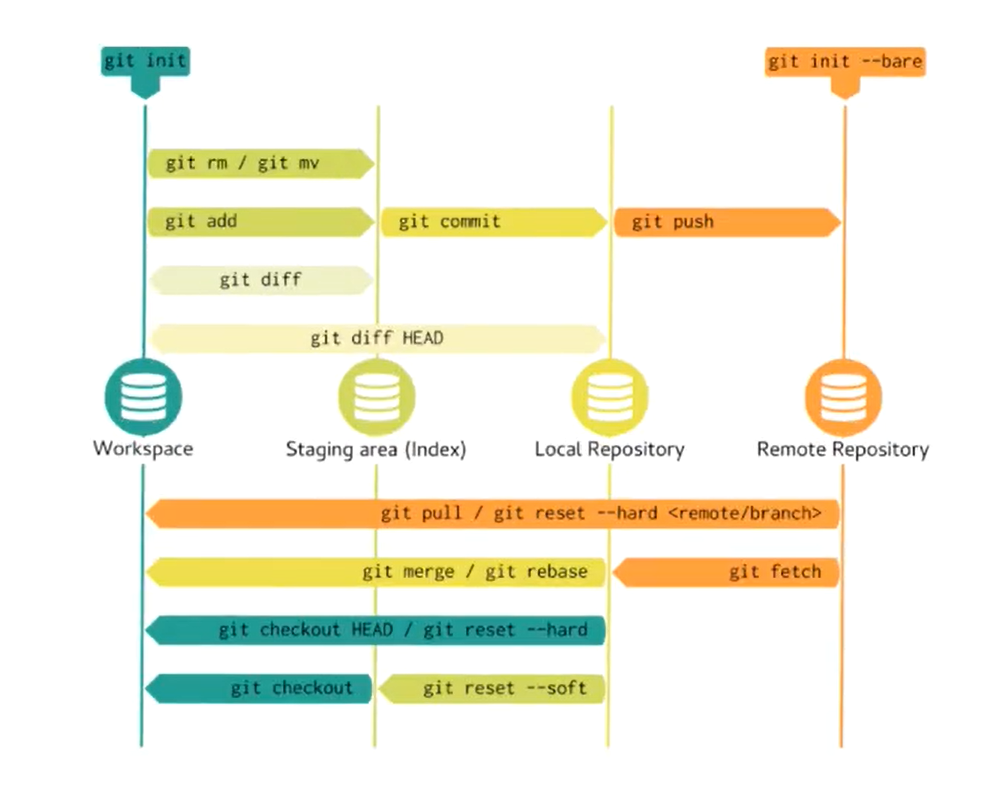
| Stage | Description | Git Commands/Actions |
|---|---|---|
| Commit Stage | Snapshots changes made to the codebase at a specific point in time.Captures additions, modifications, and deletions. Requires a commit message for context. | git commit -m “Your commit message here” |
| Stage (Index) | Acts as a staging area or buffer for changes ready to be committed.Allows selective inclusion of changes in the next commit. | git add <file or directory> |
| Repository | Stores committed changes and entire project history.Includes all commits, branches, and tags.Can be a local or remote repository for collaboration. | git push origin <branch> (for pushing to a remote repository) |
Modifying Your Code
- The initial step in utilizing Git involves making alterations to your code within the working directory. This is where you will actively edit your code and introduce new features to your project;
- To modify your code, access the project folder on your computer and implement the required changes to the files. After completing these changes, save them, and proceed to the subsequent stage.
Reviewing and Structuring Your Revisions
After making modifications to your code, it is essential to evaluate and structure these alterations before incorporating them into the repository. This is where the staging area plays a crucial role.
- To assess your alterations, employ Git’s command line to inspect the adjustments you have executed. You can employ the “git status” command to generate a catalog of all the changes that have been applied to the working directory. Subsequently, you can examine these changes and choose which ones to commit to the repository;
- For organizing your modifications, employ the “git add” command to include specific files or changes into the staging area. For instance, if you wish to commit only the changes within one particular file, use the “git add file.txt” command to include that specific file in the staging area.
Committing Your Adjustments to the Repository
Once you have assessed and organized your modifications, you are prepared to commit them to the repository.
- To achieve this, utilize the “git commit” command, followed by a descriptive message delineating the alterations you have made. For example, you can use the command “git commit -m “Added new feature to homepage”” to commit your changes along with the message “Added new feature to homepage.”;
- Upon committing your alterations, they will be stored in the repository and meticulously tracked by Git. Utilize the “git log” command to peruse a comprehensive history of all the changes executed within your codebase.
Conclusion
Git stands as a formidable tool, providing developers with a seamless means to oversee and monitor code alterations. A grasp of Git’s three pivotal stages – the working directory, the staging area, and the repository – empowers developers to efficiently navigate Git’s capabilities, enabling effective code management and collaborative efforts with fellow developers. The outlined steps in this article enable developers to seamlessly modify their code, meticulously review and structure those alterations, and effortlessly commit them to the repository.